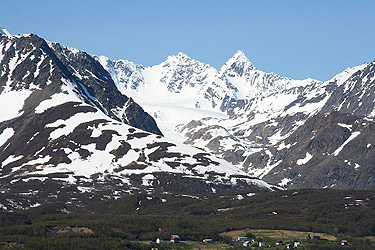
Store Lenangstind

  • Store Lenangstind
  • 1624 m
  • Primary factor 1576 m
  • Location: North 69:42.605, East 020:05.156, (GPS on the summit)
  • In Lyngen, Troms, Norway
  • Good try (did not summit) August 2, 2005. Reached about N69:42.640, E020:05.477.
  • Climbed: June 1, 2007.
  • Difficulty: Alpine PD, steep snow to 50 degrees, crevasses, YDS class 4 (August 05).
  • Difficulty: Alpine AD, steep snow to 50 degrees, YDS class 5 (winter climb, June 07).

Information:

How to get there: A good starting point is Koppangen. This is the northernmost end of the road on the eastern side of the Lyngen penisula. From Tromsø, one can drive south on E-8 to Fagernes, then turn left on Hwy. 91 and drive to Breivika. This is easily done in one hour. From Breivika, take the ferry across to Svensby and continue the short drive across Lyngseidet to the east side of the Lyngen penisula. Make a left turn as you get to the fjord and drive north until the road ends in Koppangen.
A somewhat longer, but ferryfree route is E-8 from Tromsø to Nordkjosbotn, then E-6 north to Oteren where Hwy. 868 forks left and runs north along the east side of the Lyngen penisula.
The trailhead Koppangen has elevation 2 meter and location N69:40.752, E020:15.335.
Route description: This description is based on experience from two visits, in (early) August 2005 and in (early) June 2007. Both visits had substantially winter conditions, the first visit with icy rocks covered by new snow and a very rough storm, the second visit had spring conditions large amounts of remaining snow, but perfect weather. There may be times where one can find this mountain with more rock and less snow. The conditions may then be substantially different, most likely leading to an easier ascent.
Also note that the description of the route across the glaciers clearly may be inaccurate depending on glacier movements from year to year. The route was fine with quite managable crevasses in 2005. It is believed that this general route will remain fairly stable because of the general ice flow and the rock formations that causes compression zones with relatively fewer crevasses.
To the glacier: From the trailhead, walk a short section north along the beach, near the very last building (small structure), leave the beach and locate a trail that climbs the small slope and continues west. This trail is hard to follow in a few places, it does run parallel to the river, but initially at quite some distance south. The trail runs parallel with a few fence structures and crosses through at least one fence through an opening (hole) in the fence. Further inland, the trail runs much closer to the river, in particular, at one point right next to the river, what appears to be the main trail climbs a slope uphill. However, the proper trail continues among dense vegetation extremely close to the river at this point. A possibility is to follow the trail up onto the somewhat higher plateau, but one should then immediately (after say 50 meter, descend back towards the river). The trail follows the river all the way until just below a steeper hill where the river comes down from above. Here, the trail first crosses a field of talus, then zig-zags uphill mostly on dirt. It is easier to do the climb here than making a much longer traverse among rocks which is likely if one misses the obscure trail junction described earlier.
Climb the steeper hill, the trail tops out near a cairn at the top. Traverse back to the river without gaining elevation. From here on, the faint trail generally stays close to the river as it climbs among rocks most of the way. Higher up, there is a small waterfall and one easily spots a distinct notch to the left of the river. This is the correct route. As soon as you complete hiking through the notch you will locate the green Koppangsvatnet on your right side. Continue on more or less flat terrain until you again get closer to the glacier river on your right. The approach continues up a small valley until you get quite near the end of the glacier. Locate a small rock outcrop slightly left of the low point where the river exits the glacier. Hike up on the left side of these rocks. The access onto the glacier is very easy from this location at about 483 meter, location N69:40.960, E020:10.869.
When visiting in late May/ early June, the trail that avoids much of the steep talus was still under snow, thus one had to climb the talus right next to the snow. The valley leading towards lake Koppangsvatnet was mostly snow covered. Lots of avalanches (coming from your left as you ascend), largely extended all the way down to the creek. We skied from the top of the steep talus and all the way to the glacier.
Crossing Koppangsbreen: Climb the initially steeper part of the glacier by an ascending traverse to your right (northwest). The angle is not very steep and there are few crevasses. As you get higher, continue on a north-west course with the normal adjustments for crevasses. There is a long, distinct moraine of rocks that should be crossed. Maintain your elevation and set course in order to make a gradual ascent. Notice the glacier water below you to the north (right hand side). The best route is likely to be an arc starting out to the west and ending more north just west of the rock ridge that runs straight west from Store Koppangstinden (1224m).
In May/June, we could hardly see any crevasses along the route just described. One can ski pretty safely all the way to the campsite.
Across Strupbreen: At elevation 886 meter, location N69:41.954, E020:08.352, Koppangsbreen is definitely behind you. You have just passed the distinct west ridge of Store Koppangstinden that cuts deeply into the glacier. Continue almost horizontally while traversing the gentle slope of Strupbreen to the northwest. Ahead, you will see a pronounced icefall with a more smooth slope further right before the rocks. This is indeed a good route that will lead you upwards to the foot of Store Lenangstinden. The somewhat steeper part of the glacier route tops out at elevation 1131 meter, location N69:42.309, E020:06.217.
Up the snow slope: From the top of the glacier slope (you are still on Strupbreen), head up and into the only large "valley" coming down from the north. In really bad weather (as we had) it may be helpful to notice that UTM coordinate line "65" runs north-south exactly along the route of ascent. The more distinct snow slope starts at elevation 1302 meter, location N69:42.594, E020:05.757. However, this is still on the glacier. There is a heavily crevassed area higher up that marks the break between the large snow gully above and the Strupbreen glacier below.
The best route across here may be different from year to year. The following worked well for us: Head straight up the slope aiming left of a large crevasse that blocks access further right. Continue until you come upon a crevasse that blocks your way. Go right and find a zig-zag path that connects to the opposite (higher) side of the crevasse. There is a small, vertical rockface that runs above you. Get onto the ice formation just below this rock (possibly by descending a bit to your right). Follow this ledge more or less horizontally below the rock until it connects directly into the snow gully above you. Beware of the bergschrund between your ice ledge and the rock above you.
Turn into the snow gully and kick steps more or less straight up. This gully is quite steep, GPS measurements indicate a slope of up to 45-50 degrees. Continue uphill until you reach the saddle at elevation 1443 meter, location N69:42.656, E020:05.649. In May/June, the crevasse problems were virtually eliminated.
Climb the east ridge: From the saddle, proceed up the ridge among scattered rocks, as you approach a vertical rock step above you, make a left ascending traverse and gain the ledge just below it. Follow through to the right and enter the upper part of a gully that is steeper below you. Climb this gully until it tops out. Above it, traverse right until it is easier to again climb left and get back on the top of the ridge. At this point the ridge is about 2 meter wide and fairly horizontal. Continue up on top of the ridge, as it gets more narrow and somewhat exposed. Step across a top point and descend slightly to a small notch on the ridge. The ridge is still very narrow at this point. After this, the ridge is again somewhat broader and fairly flat. A new, steep rock blocks the way ahead. We climbed this point, but decided that the descent into the saddle above was more complex than traversing around it. Thus, make another horizontal move out right and locate a rather large gully that runs from far below and up to the saddle on the upper side of this subsidiary point on the ridge. Gain this saddle, then continue on or near the top ridge the rest of the way to the summit.
The summit is made up by a fairly horizontal, slightly curved ridge, perhaps 20-30 meter long.
In our May/June climb, the entire route was a snow climb. We protected the entire route, taking 8 60 meter ropelengths from the saddle in order to gain the summit. There are two main obstacles on the ridge that both needs to be bypassed by traversing right, then regain the ridge by climbing easier terrain, typically in a gully. Refer to the trip report for further details as well as pictures from the route.
Also, see the very nice description of this trip on Geir Åke's webpage.
Comments: Note that the current M711 map is wrong and does not even list the correct elevation. The previous map listed 1596 meter, however, the official elevation is 1624 meter, a fact that is not widely known.
My first attempt on this peak was August 2. 2005. Together with Edward Earl from San Diego, we came within a few hundred meter of the summit. A more detailed (and slightly illustrated) report from this attempt is available.
Our next assault on this very prominent peak was June 1. 2007. This time we were a party of three, Edward retuning from California as well as Geir Åke Dahlen and myself.
We had an unforgettable 18 hour climb in the best weather possible. A more extensive and heavily illustrated trip report is available.
We proceeded south in search for easier terrain that would not require skiing. Thus, the next peak on this trip turned out to be Trollfjellet.

Resources: